How to Clean a UV Quartz Sleeve on a Private Well
A source-linked homeowner decision surface for cleaning or replacing a UV quartz sleeve, checking sensors and O-rings, restarting safely, and deciding when to test well water.
The short answer
Shut off water and power, release pressure, and let the lamp cool according to the exact manual. Clean only mineral fouling with the model-approved mild cleaner; replace a sleeve that is cracked, scratched, or still cloudy after cleaning. Inspect the O-rings, leak-check slowly, confirm power and alarms, and follow the manual’s restart or disinfection steps. If treatment was off while water was used, or water changed, use alternate water and arrange local-health-department guidance and certified testing.How to Clean a UV Quartz Sleeve on a Private Well
Short answer: clean a UV quartz sleeve only when the problem is removable mineral or sediment fouling and the installed system’s manual approves the cleaning method. A scratched, cracked, or still-cloudy sleeve is a replace decision, not a stronger-cleaner decision. Before service, record the model, lamp age, alarm state, sensor and prefilter condition, and treatment interruption. During service, shut off water and power, release pressure, let the lamp cool, inspect the O-rings, and use the model’s reassembly sequence. Afterward, repressurize slowly, leak-check, confirm the controller and alarm state, and follow the manual’s restart or disinfection instructions. If UV protection was unavailable while water was used, water changed, or contamination is possible, use alternate water and ask the local health department or a state-certified laboratory what testing and release steps apply.
This is a homeowner decision surface, not permission to improvise around a pressurized or energized system. A UV chamber is one part of a private-well treatment train. The quartz sleeve protects the lamp from direct contact with water while allowing UV light to pass through; mineral fouling reduces that transmission. VIQUA describes a fouled sleeve as a condition that reduces UV dose and system effectiveness. The exact installed model controls the cleaner, parts, disassembly order, torque or hand-tightening instructions, cool-down time, sensor procedure, and recommissioning steps.
1. Decide before you disassemble
The safest first question is not “what cleaner should I use?” It is “which decision branch am I in?” Use the matrix below before closing valves or removing a lamp. If you cannot establish the condition, choose the more protective branch and call a qualified water-treatment professional.
| What you observe | Decision | Safest next step |
|---|---|---|
| A thin mineral or iron-colored film is visible, the sleeve is intact, and the exact manual provides a cleaning method | Clean | Follow that manual’s isolation, pressure-release, cool-down, cleaner, rinse, and reassembly sequence. |
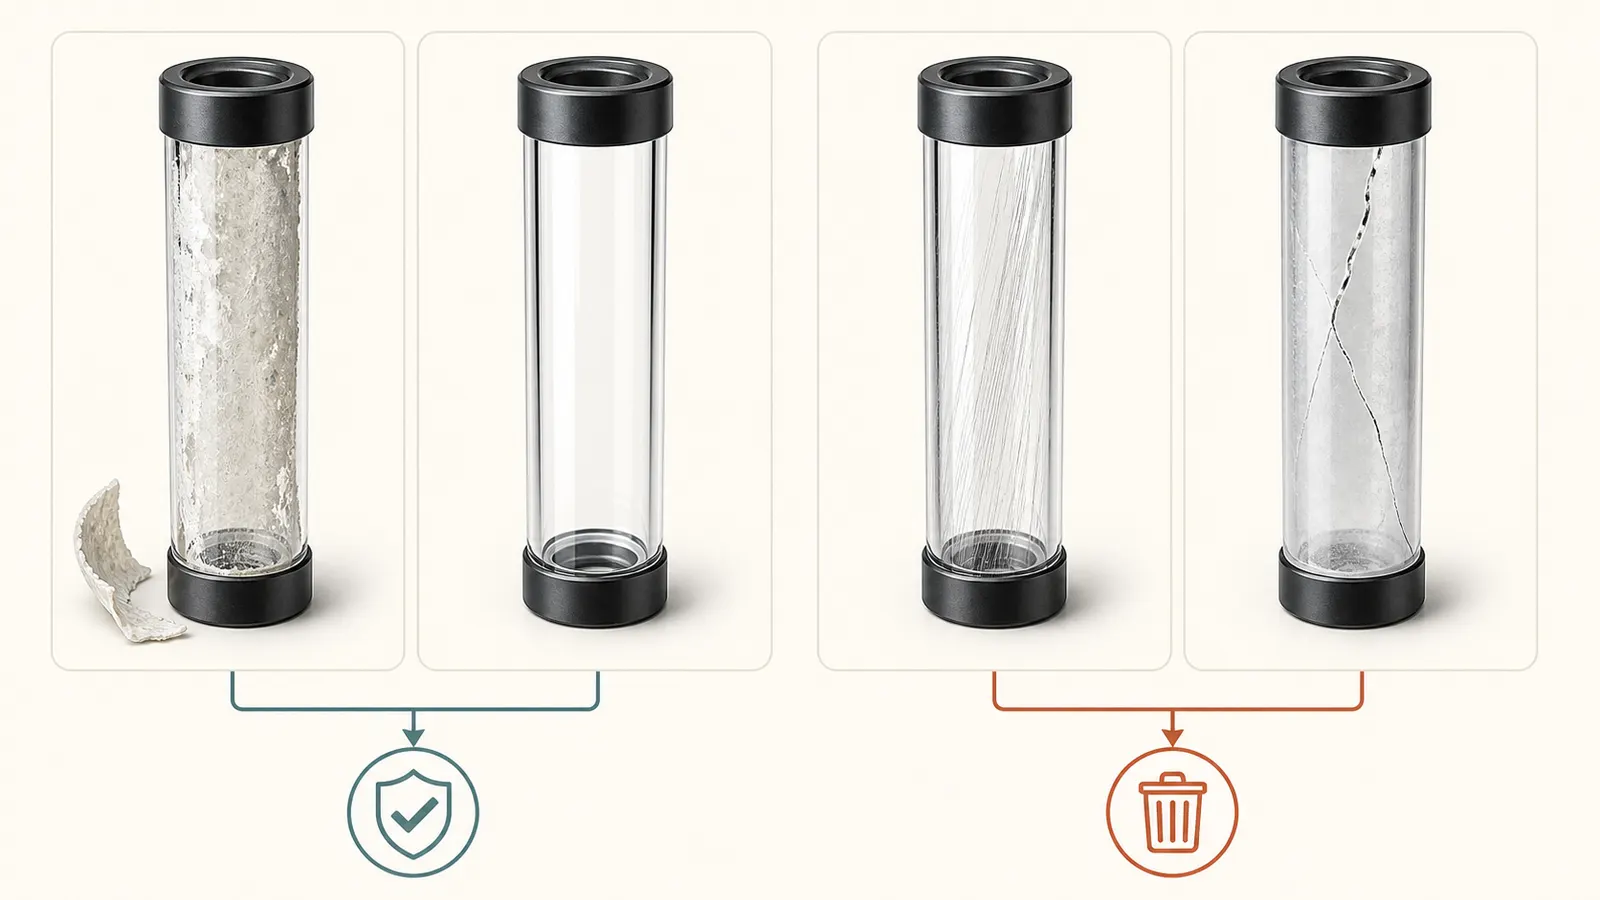
| The sleeve is cracked, chipped, scratched, or remains cloudy or hazy after the approved cleaning method | Replace | Use the exact model-matched sleeve and new seals if the manual calls for them. Do not polish, sand, scrape, or keep using a damaged sleeve. VIQUA specifically identifies surface damage and post-cleaning haze as replacement conditions. |
| A seal is cut, abraded, flattened, missing, contaminated with grit, or leaks after reassembly | Stop and replace the seal | Shut water off, release pressure using the manual’s method, and install the exact replacement O-ring or have the service completed professionally. Never solve a leak by tightening blindly. |
| The sleeve is clean but a sensor or low-UV alarm remains, or the controller cannot confirm adequate intensity | Stop-use or escalate | Check the manual’s safe sensor procedure and alarm meaning. If the alarm persists, keep drinking water on an alternate source and arrange qualified service and, where appropriate, water testing. |
| Flow or pressure fell and the upstream sediment cartridge is loaded, bypassed, or overdue | Service the prefilter | Follow the prefilter manual and verify that the UV system’s required water-quality and flow conditions are restored. A clean sleeve cannot compensate for poor pretreatment. |
| The lamp is beyond its manual life, has a lamp-failure alarm, or has an unknown service history | Replace or escalate | Use the exact approved lamp. A glowing lamp is not proof of adequate UV output; Pentair warns that visible blue light and similar appearance do not establish equivalent disinfection performance. |
| The chamber, wiring, controller, pump, wellhead, piping, or nearby equipment is wet, charred, melted, exposed, or damaged | Stop-use and escalate | Do not energize, open, test, or repair it. Use alternate water and call a qualified electrician, well/pump contractor, or treatment professional. |
The clean branch applies to mineral or sediment deposits on an intact sleeve. It does not apply to a sleeve that has been struck, forced, chemically damaged, or heated. The replace branch is also appropriate when the approved cleaning method fails to restore transparency. That distinction matters because the sleeve’s job is optical: a visually “mostly clean” surface may still leave the system unable to deliver its intended dose, while a crack creates a mechanical and contamination risk.
For a high-safety water system, observe from outside the hazard boundary. Do not open an energized controller or pressure switch, test live wiring, pull a pump, open the well, enter a well pit or other confined space, remove a pressurized fitting, or manipulate a pressure tank. Do not touch a wet electrical enclosure. CDC says emergency well work can be hazardous, prohibits entering a well pit, and recommends qualified electrical, well, or pump review before power is restored when wiring may be damaged.
2. Record the baseline before service
The most useful service record is made while the system is still assembled. It prevents a common failure mode: a homeowner cleans the sleeve, then cannot tell whether a later alarm comes from the sleeve, sensor, lamp, filter, water quality, wiring, or an incorrectly replaced seal.
Write down or photograph the following from a safe, dry location:
- UV manufacturer, exact model, serial number, and installation date if known.
- Whether the system is whole-home point-of-entry or point-of-use, and which fixtures it serves.
- Lamp installation date, displayed lamp hours or remaining life, and the part number if visible.
- Controller lights, numeric codes, audible alarms, UV-intensity value, and whether an optional sensor or solenoid is installed.
- Prefilter type, micron rating if printed, cartridge installation date, pressure or flow symptoms, and whether the filter housing is in normal or bypass position.
- Sleeve appearance: clear, mineral-coated, cloudy, scratched, chipped, cracked, or unknown. Take a photo without removing the lamp.
- Any moisture or drip at the chamber, retaining nuts, sensor, drain, unions, or nearby piping.
- The last time water was known to be treated normally and any period when power, water flow, or treatment was interrupted.
- Recent changes in water color, odor, taste, sediment, iron staining, hardness scale, or pressure.
- The date and results of the last private-well water test and the laboratory used.
This record is also a professional handoff. If you need service, a technician can start with the model and timeline instead of guessing. Bring the manual, photos, alarm history, part labels, and your description of what water was used while the treatment was unavailable.
Establish whether the problem is optical, hydraulic, or biological
The controller’s information is evidence, not a diagnosis. A low-UV reading can be caused by a dirty sleeve, a dirty sensor window, an aging lamp, voltage problems, changed influent water quality, or an incorrectly installed sensor. Pentair lists several of those branches in its troubleshooting section. A pressure drop can be a clogged sediment prefilter or a source-pressure issue; it is not automatically a lamp or sleeve problem.
Likewise, a normal lamp indicator does not prove that the water was safe during a prior outage. UV only addresses the contaminants within the system’s validated scope. CDC explains that UV systems disinfect or reduce germs, work better with prefiltration, and do not remove chemicals. That is why a fuel odor, chemical spill, or new water-quality change must not be “cleaned up” by servicing the sleeve.
3. Clean only when the sleeve is cleanable
The exact manual is the controlling document. Find it before starting and confirm the model, replacement parts, cleaner, seal arrangement, drain method, and restart instructions. A manufacturer’s generic homeowner page is useful background but cannot replace the manual for a particular chamber.
Pentair’s PUV-7 and PUV-14 manual provides a clear example of the sequence: shut off water and drain the lines, remove the lamp, remove the retaining hardware and O-rings, remove the sleeve carefully, clean it with a cloth soaked in CLR, vinegar, or another mild acid, rinse with water, then replace it if it cannot be cleaned fully or is scratched or cracked. See the primary manual’s sleeve procedure. Do not turn that example into a universal chemical recommendation. Another manufacturer may specify a different cleaner, concentration, contact time, cloth, rinse, or complete replacement.
The safe preparation sequence
Plan for alternate water. If the unit will be offline, do not use treated water for drinking, cooking, ice, or brushing teeth unless your health department or treatment professional has given you a suitable interim plan. If the unit was already alarming or treatment was interrupted, assume the water-release question is unresolved.
Identify the isolation and drain points. Use only valves and drains identified in the manual or clearly labeled on the installation. Do not remove a cap or union to “find” the drain. If the chamber cannot be isolated and depressurized without manipulating uncertain or damaged plumbing, stop and call a professional.
Shut off water flow and release pressure. Pentair’s maintenance warning says to shut off the water line and release system pressure before service. The manual also begins sleeve cleaning by shutting off the water supply and draining the lines. Follow the installed manual’s order. Never loosen a retaining nut while the chamber is pressurized, and never use your hand to search for a leak around a pressurized fitting.
Disconnect power and wait for the model’s cool-down period. Do not work on a powered lamp or controller. Pentair specifies a 10-minute cool-down for the cited models; another system may specify a different time. Do not look directly at a glowing UV lamp. If the controller is hardwired, wet, damaged, or you cannot safely identify the disconnect, assign the work to a qualified professional.
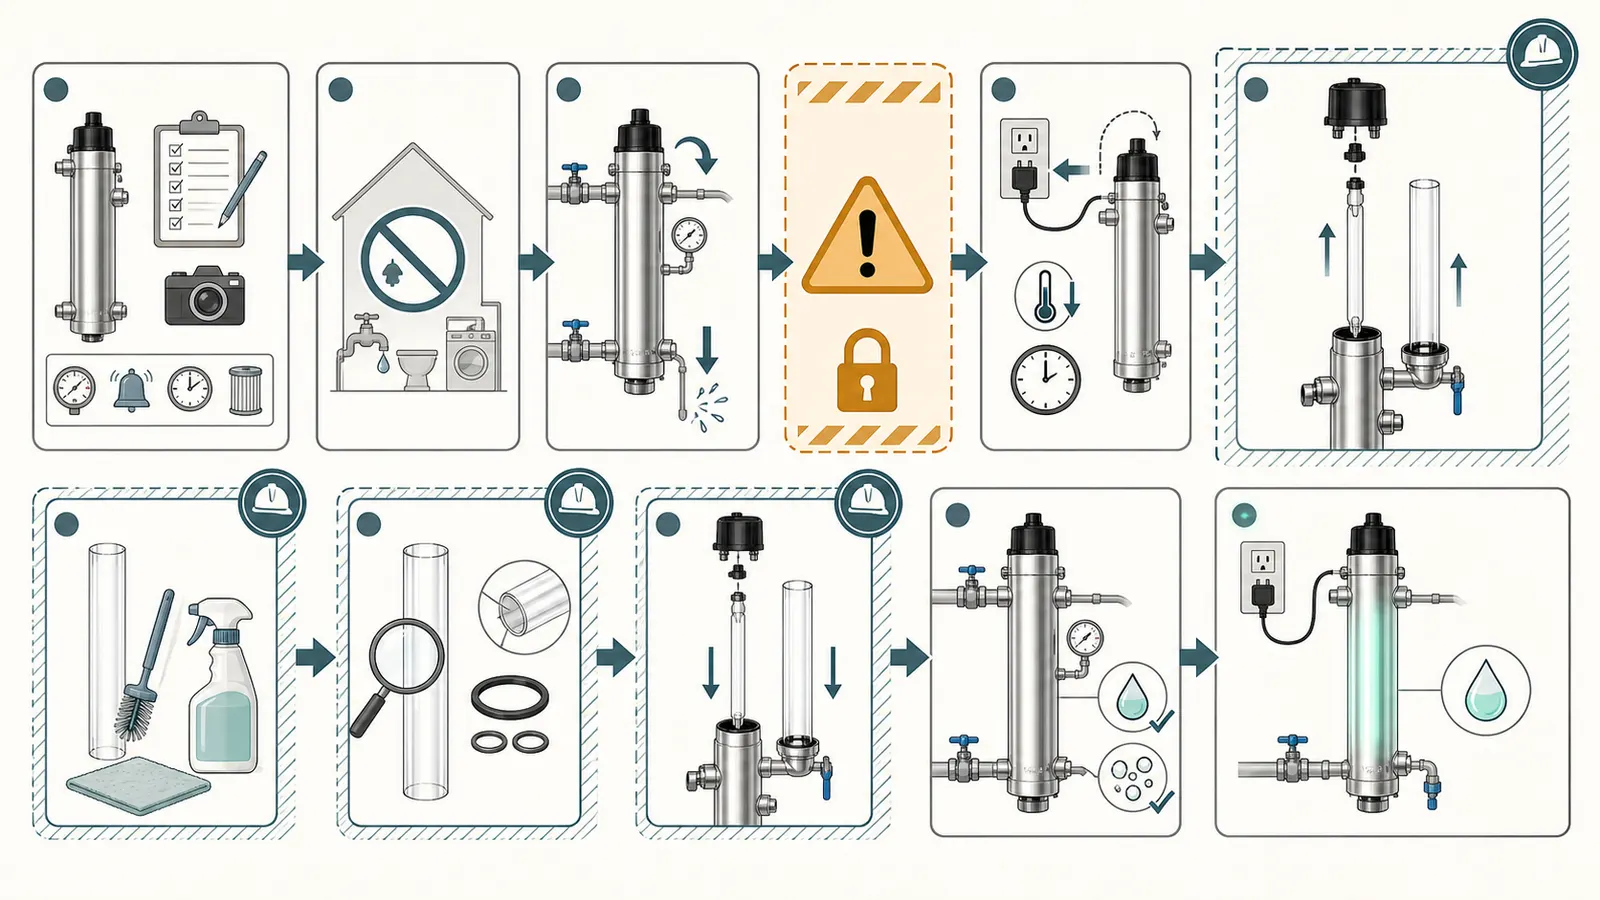
Protect the glass and the work area. Use clean hands or the handling method in the manual. Do not set a quartz sleeve on a hard, dirty, or unstable surface. Keep the lamp and sleeve away from tools, grit, children, pets, and a sink edge. Quartz can break without much warning.
Remove only what the manual identifies. Some systems require the lamp to come out before the sleeve; some include springs, spacers, sensors, or retaining nuts in a particular order. Do not pry against the chamber, twist a sensor cable, or use force to free a stuck sleeve. A stuck or brittle part is an escalation signal.
Cleaning technique and chemical boundaries
Use the approved cleaner on a soft cloth, and rinse the sleeve completely with clean water. Do not use a wire brush, abrasive pad, blade, sandpaper, solvent, or an unapproved descaler. Do not increase acid strength or contact time because the deposit looks stubborn. Do not mix an acid cleaner with bleach or another product. Follow the product label and safety data sheet, ventilate the area, protect eyes and skin, and keep the cleaner away from drinking-water connections except where the exact manual directs its use.
Inspect the sleeve under good light after rinsing. It should be free of the visible deposit and should not remain hazy in the way described by the manufacturer. Do not decide that “almost transparent” is good enough if the manual calls for a clear sleeve or if the controller still reports low intensity.
What to do with the O-rings
O-rings are not decorative washers. They form the water seal. Look for cuts, abrasions, flattening, hardening, grit, distortion, or a ring that stayed stuck to the sleeve or retaining hardware. Use the exact seal specified for the model; do not substitute a random hardware-store ring because it appears to fit. Pentair identifies O-ring seals as a likely leak source and instructs the operator to clean and reinstall them, replacing them when necessary. Read the manual’s leak and troubleshooting guidance.
Do not add lubricant unless the exact manual specifies the product and location. Excess lubricant can migrate into the water path or interfere with seating. If the seal will not sit evenly, stop rather than tightening the retaining nut harder.
4. Separate sleeve fouling from sensor, prefilter, or lamp failure
Cleaning the sleeve is only one diagnostic branch. The table below is intended to keep the next action proportional to what you can actually observe.
| Observation or record | What it supports | What not to infer | Next action |
|---|---|---|---|
| Coating wipes away and sleeve is transparent after approved cleaning | Fouling was likely reducing UV transmission | That the lamp is new or that the water is microbiologically safe | Reassemble, leak-check, confirm alarms, and follow restart/testing instructions. |
| Sleeve is clean but low-intensity alarm remains | Sensor window, lamp, power, flow, water quality, or sensor installation may be involved | That another round of acid will fix it | Read the alarm branch in the manual; clean the sensor only if the model procedure is safe and clear; otherwise escalate. |
| Sensor window has mineral or sediment residue | Sensor may be reading reduced UV energy | That the sleeve itself is the only dirty component | Use the exact sensor procedure. Pentair calls the sensor window delicate and says sleeve and sensor cleaning may be done together. |
| Pressure or flow has dropped and the prefilter is loaded | Pretreatment may be restricting flow or allowing poorer UV conditions | That the UV chamber has failed | Service the prefilter per its manual and investigate changed source water if the symptom persists. |
| Lamp age is beyond the model’s service interval or a lamp-failure alarm is present | Lamp replacement is indicated | That visible blue light confirms performance | Use the exact approved lamp, reset the timer only as directed, and verify the controller. |
| Sleeve is scratched, cracked, chipped, or cloudy after cleaning | Replacement is indicated | That polishing, scraping, or a stronger cleaner is safe | Keep the system out of normal drinking-water service until the correct replacement and seal inspection are complete. |
| Water appears normal but the UV unit was off during use | Treatment history is incomplete | That restored power treated water retroactively | Use alternate water and follow the interruption branch below. |
| Alarm returns after correct cleaning, lamp, sensor, and prefilter service | The fault may be electrical, hydraulic, optical, or water-quality related | That the alarm can be ignored or deferred indefinitely | Stop relying on the unit for drinking water and arrange qualified diagnosis. |
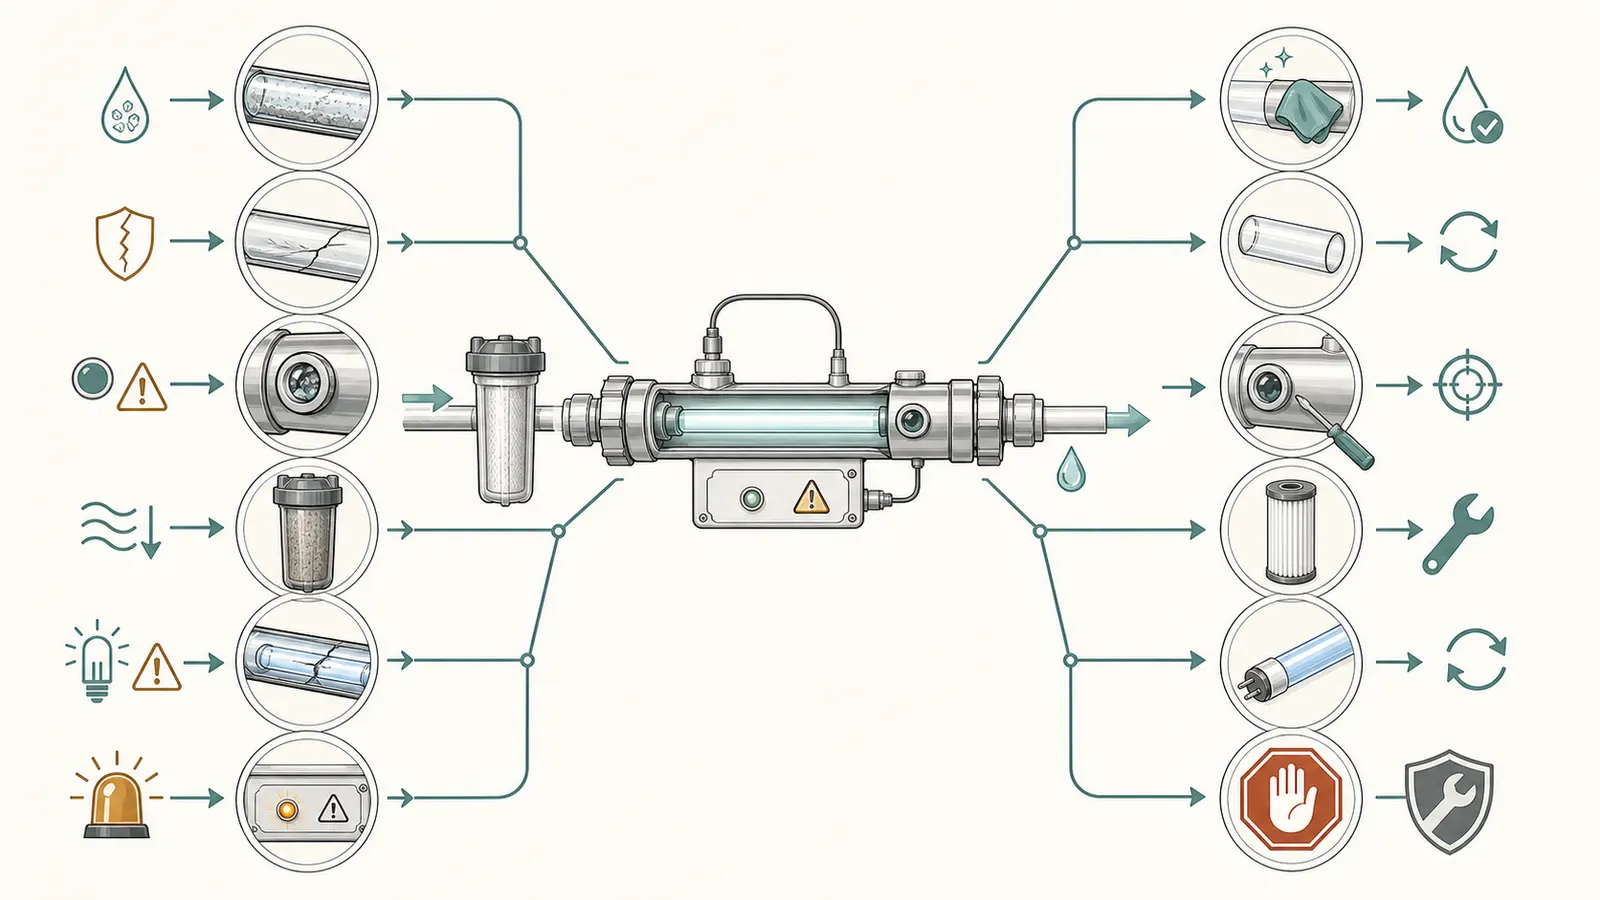
VIQUA’s FAQ gives one example of a model-specific maintenance pattern: sleeve cleaning at least every 12 months, more often where mineral or organic content is high, and replacement after 2–3 years or when damaged or still hazy. Those intervals are VIQUA guidance, not a universal residential schedule. Your own service record should let the water and the system’s actual alarm history adjust the interval. Frequent fouling is a clue about source-water quality or pretreatment, not merely a reason to clean more aggressively.
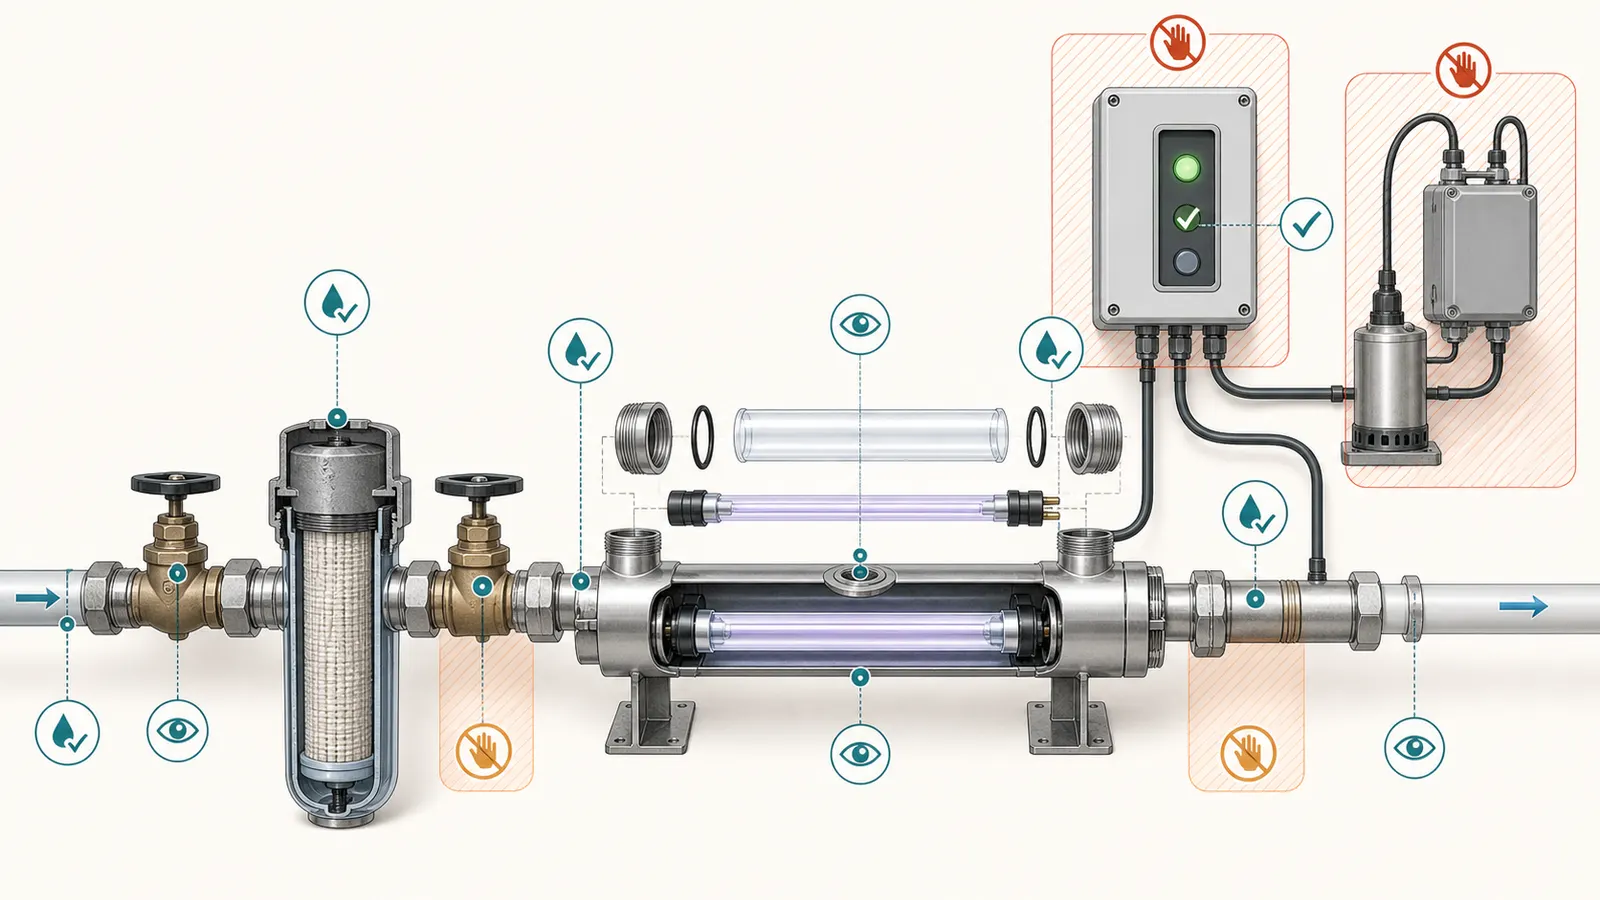
5. Reinstall and recommission deliberately
The service is not complete when the sleeve looks clean. It is complete only after the water seal, lamp connection, controller state, flow path, and treatment decision have been checked.
Reassembly gate
Before closing the chamber, confirm:
- The sleeve is the correct model and is free of cracks, chips, scratches, and residual haze that the manual treats as unacceptable.
- The sleeve is seated in the correct position and orientation. Pentair’s example requires equal protrusion at both chamber ends; other systems may use a different arrangement.
- The O-rings are the correct parts, clean, undamaged, and seated where the manual shows them.
- Retaining nuts, springs, spacers, sensor hardware, and lamp connectors are installed in the documented order.
- The lamp is the exact approved type and is handled at the ends as directed. Do not touch the glass if the manual prohibits it.
- The controller cover, cable, and fittings are dry and intact.
- Any removed prefilter cartridge is correctly replaced and the filter housing is in the intended position—not accidentally bypassed.
Do not invent a torque value. If the manual says hand-tighten, follow it. If it specifies a tool or torque and you do not have the means to perform it correctly, call a professional.
Leak-check and restart
- From a safe position, open the water supply slowly according to the manual. Do not stand over a retaining nut or place fingers around the chamber.
- Observe the chamber ends, sensor, drain, unions, and nearby fittings for drips or spray. A dry paper towel held nearby—not wrapped around a pressurized joint—can reveal a slow drip without skin contact.
- If water leaks, shut off the supply and follow the manual’s depressurization procedure. Do not keep tightening while pressurized. Pentair’s troubleshooting guidance sends a leaking unit back through water shutoff, cell draining, O-ring and thread cleaning, and correct reinstallation. A damaged seal or repeated leak is a stop-and-escalate condition.
- Once dry and stable, restore power only as the manual directs. Confirm the power-on indication, lamp status, sensor or intensity reading if present, and the absence of unresolved alarms. Never stare into the lamp or open the controller to verify wiring.
- Run water only for the manual’s flush or purge instruction. Pentair tells operators to run water for a few minutes after installation to clear air or dust from the chamber and to flush warm water after extended no-flow periods. Treat those times as model-specific guidance, not a universal promise that water is microbiologically safe.
Pentair also says its downstream plumbing disinfection procedure must be performed after a lamp or sleeve replacement and whenever the UV unit is shut down for service, without power, or inoperative. That is a manufacturer-specific recommissioning requirement. Do not inject bleach into your well or house plumbing based on this article alone. Some homes have treatment devices, septic systems, plumbing materials, or local requirements that change the safe method. Ask the exact manufacturer, local health department, or qualified well-treatment professional before disinfecting.
The release gate
Release the water for normal drinking use only when all of the following are true:
- The sleeve decision is resolved: cleaned and transparent, or replaced with the correct part.
- The O-rings and chamber are dry after slow repressurization.
- The lamp and controller status match the manual, and no unresolved alarm remains.
- The prefilter is correctly installed and not obviously clogged or bypassed.
- The manual’s post-service flush or disinfection step is complete.
- No outage, bypass, pressure loss, chemical odor, visible damage, or new water-quality change creates a separate water-safety branch.
- Any testing or local-health-department instruction triggered by the event has been completed and interpreted.
A powered controller is only one item in that list. It tells you that the controller has power or that a monitored condition is within its displayed range; it does not test the well for nitrates, metals, fuel, or every microorganism.
6. When interrupted UV changes the water decision
Sleeve cleaning and water safety are connected but not identical. If the UV system was off while nobody used water, the main question may be service and recommissioning. If people used water while UV was off, alarming, bypassed, or unable to confirm adequate intensity, the system cannot retroactively treat that water.
Use the following event branches:
| Event history | Water decision | Documentation and next step |
|---|---|---|
| Sleeve was dirty, but UV remained powered, the system had no alarm, and no water-quality change occurred | The cleaning is a maintenance event; follow the model’s service and release steps | Record the service and ask the laboratory or health department whether a post-repair sample is appropriate. |
| UV was without power, alarming, or bypassed while water was used | Do not use that water for drinking, cooking, ice, or brushing teeth until the situation is evaluated | Record when treatment was unavailable, how much water was used, and which fixtures were used. Use alternate water and contact local health or treatment support. |
| The pressure system lost pressure, water spurted, or the cause is unknown | Treat as a possible private-well contamination event | Use alternate water and ask the local health department or certified lab about bacterial and event-specific testing. |
| Water has a new fuel, solvent, pesticide, smoke, or chemical odor | Stop using it; do not try to boil or disinfect the smell away | CDC says fuel or toxic chemical contamination is not made safe by boiling or disinfection. Contact local health or environmental officials. |
| Water changed color, taste, or odor after service or a nearby event | Stop drinking until the cause is understood | CDC and EPA both identify a water-quality change and well-system repair as reasons to test using a certified laboratory. CDC’s testing guidance is here; EPA’s private-well guidance is here. |
CDC recommends that private wells be tested at least annually for total coliform bacteria, nitrates, total dissolved solids, and pH, with local advice about additional germs or chemicals and a state-certified laboratory used for testing. See the CDC baseline. That routine panel is not a universal answer to a UV interruption. The right additional tests depend on what happened: a repair, a pressure event, changed water quality, fuel, agricultural activity, flooding, or another local source.
Testing is also not a substitute for repair. If the wellhead, electrical controls, pump, pressure tank, treatment unit, piping, or septic system may be damaged, keep the system out of service as appropriate and arrange qualified inspection. Never open the well or pull the pump to speed up a test. CDC’s emergency guidance assigns hazardous well work to qualified contractors.
7. Keep a service log and know when to hand it off
For a private well, the reusable tool is a record that connects treatment condition to water-use decisions. Keep one page with the manual and add an entry for every inspection, alarm, cartridge change, sleeve service, lamp change, outage, and water test.
UV service and water-safety checklist
Before service
- Exact manufacturer, model, serial number, and manual located.
- Whole-home or point-of-use coverage recorded.
- Lamp date or hours, sensor status, alarm code, and prefilter condition recorded.
- Sleeve photographed and classified as fouled, intact, scratched, cracked, hazy, or unknown.
- O-rings, retaining hardware, chamber, drain, unions, and controller checked from a safe location.
- Treatment interruption, bypass, pressure loss, water use, and new color/odor/taste recorded.
- Alternate drinking water available if the unit will be offline or the event is unresolved.
During service
- Water isolated and pressure released according to the exact manual.
- Power disconnected and lamp cooled for the model’s specified time.
- No energized control, live wiring, well opening, pump, pressure tank, or confined space entered.
- Approved cleaner and soft cloth used; sleeve rinsed completely.
- Sleeve rejected if cracked, scratched, chipped, or still hazy after approved cleaning.
- O-rings inspected and replaced with exact parts if damaged or uncertain.
- Sensor handled only under the model-specific procedure.
After service
- Sleeve and hardware reinstalled in the documented order and position.
- Water restored slowly; no leak seen at chamber, seals, sensor, drain, or fittings.
- Controller powered safely; lamp, sensor, flow, and alarm status recorded.
- Manual’s flush, downstream disinfection, or other recommissioning requirement completed.
- Water-release branch reviewed for interruption, pressure loss, damage, chemical odor, and changed quality.
- Laboratory or health-department advice recorded if testing was triggered.
Escalate instead of continuing when the sleeve is stuck, the chamber leaks after one correct reassembly, a sensor window is chipped, the controller alarm persists, the lamp part is uncertain, water quality changed, the prefilter repeatedly loads, or the treatment train’s flow and water-quality requirements are unknown. Also escalate any electrical damage, wet controller, exposed wire, wellhead damage, pressure-tank problem, pump fault, or septic-system concern.
The professional should receive the log, model numbers, manual, photos, alarm history, outage timeline, last laboratory report, and the exact water-use history during any treatment interruption. Ask for three separate conclusions: what failed mechanically, whether the treatment system is operating within the installed model’s requirements, and what water testing or release decision is appropriate for the private well. Keeping those conclusions separate is what prevents a cleaned sleeve from being mistaken for a complete water-safety certification.
Sources and scope
Evidence behind this page
- VIQUA — UV System Maintenance
VIQUA homeowner guidance for VIQUA systems. It supports the general fouling mechanism and clean-versus-replace decision, not a universal cleaner, lifespan, or performance guarantee for every brand.
- VIQUA — FAQs
The damage and post-cleaning haze rule is manufacturer-specific evidence used as a conservative model-agnostic decision boundary. The article does not turn VIQUA's calendar intervals into a universal schedule.
- VIQUA — UV System Maintenance
VIQUA homeowner guidance. The annual interval is an example tied to continuously used VIQUA systems; the article does not turn it into a universal schedule or claim that a lamp's visible light proves current UV output.
- Pentair — PUV-7 and PUV-14 UV Systems Owner's Manual
The 9,000-hour interval applies to Pentair PUV-7 and PUV-14 models. The warning supports treating lamp appearance as insufficient evidence of performance, not a universal lamp replacement interval.
- Pentair — PUV-7 and PUV-14 UV Systems Owner's Manual
A model-specific primary manual. It is cited as an example of a documented residential procedure; the article requires the homeowner to use the exact installed model's manual for cleaner, disassembly order, seals, and reassembly.
- Pentair — PUV-7 and PUV-14 UV Systems Owner's Manual
The exact 10-minute interval is for the cited Pentair models. The article generalizes only the safety sequence and directs the homeowner to the installed manual for the applicable cool-down time and service steps.
- Pentair — PUV-7 and PUV-14 UV Systems Owner's Manual
Manual instructions for the cited Pentair system. The article uses them to support an observable leak-check gate and inspection of seals, not a universal torque value or seal lubricant specification.
- Pentair — PUV-7 and PUV-14 UV Systems Owner's Manual
Troubleshooting and maintenance guidance for the cited Pentair models. It supports separating sleeve, sensor, prefilter, and lamp branches; it does not prove that a particular alarm has one cause on another system.
- CDC — About Home Water Treatment Systems
General CDC description of household UV treatment. It supports the article's distinction between germ treatment and chemical contamination, without making a claim about a specific UV model's validated dose or flow.
- Pentair — PUV-7 and PUV-14 UV Systems Owner's Manual
A model-specific restart and disinfection requirement. The article does not instruct a homeowner to inject chlorine into a well or plumbing without local and exact-manual guidance.
- CDC — Guidelines for Testing Well Water
General CDC private-well testing guidance. The annual panel is a baseline, not proof that a treatment interruption or a suspected chemical release has been resolved.
- CDC — Guidelines for Testing Well Water
General testing triggers from CDC. The article applies the repair trigger conservatively to treatment service and tells the homeowner to confirm the appropriate sample point and analytes with the laboratory or health department.
- CDC — How to Disinfect Wells After an Emergency
CDC emergency guidance. It supports the stop-use branch for treatment interruption with suspected contamination, chemical odor, or damage; it does not say that every routine sleeve cleaning contaminates a well.
- CDC — How to Disinfect Wells After an Emergency
Emergency well safety precautions. The article uses this source to define the boundary around energized controls, opening a well, pulling a pump, confined spaces, and damaged wiring.
- U.S. EPA — Protect Your Home's Water
EPA private-well protection and testing guidance. It supports the testing and chemical-event branches but does not set a universal laboratory panel for a UV outage.